Mini Games

From Hello Kitty Island Adventure Wiki
Jump to navigation Jump to search

Spoilers may be contained on this page.

There are a total of 6 Mini Games that the player can play around the island! Playing them costs Game Ticket Icon.png Game Tickets. Each mini game has different rewards, and possible rewards include clothing, materials, comics, and furniture.

All mini games can be played with a multiplayer friend, but the guest player can only win the most basic prizes.

Bogging for Apples

"Bogging for Apples" Information
Bogging for Apples is a mini game located in tje Spooky Swamp Icon.png Spooky Swamp, near the Spooky Swamp Fast Travel Icon.png mailbox, within the Hedge Maze.

After paying a Game Ticket Icon.png Game Ticket to the mini game's Nul Icon.png nul, the player must collect 25 Item ing apple minigamevariant.png Ghost Apples — found throughout the maze — before the 60 second (i.e. one minute) timer runs out.

Before the version 1.5 update, this game had the player collect normal apples from around the maze. Unlike regular apples, Ghost Apples do not go into the player's inventory.

"One Game Ticket Icon.png Game Ticket for one minute. Grab as many Apple.png Apples as you can!"

Tips for Winning Bogging for Apples

Bogging for Apples can be very difficult to win without the use of Companion Abilities and/or a Speedy Walking Potion.png Speedy Walking Potion.

Here are some options:

  • Use Pompompurin-icon.png Pompompurin's Pudding Pants ability to jump over the maze walls to navigate it more easily. His Slow & Steady also increases the time on the clock by 5 seconds.
  • Use Pekkle-icon.png Pekkle's Speed Walker ability to move faster through the maze.
  • Use a Speedy Walking Potion.png Speedy Walking Potion to move faster through the maze. This can be combined with Companion Abilities like those of Pompompurin-icon.png Pompompurin (jumping higher and 5 additional seconds) or Big Challenges Icon.png Big Challenges (auto-pickup).

There is no optimal path through the maze because there are more possible spots for apples to appear than there are apples.

Prizes for Bogging for Apples

You can win prizes even if you miss picking up 1 Item ing apple minigamevariant.png Ghost Apple.

List of Potential Prizes
Image Name Amount Further Information Probability
Apple.png Apple 5 Basic reward for winning. -
Mushroom.png Mushroom 10 Basic reward for collecting all apples. -
Red Bow Apple Pie.png Red Bow Apple Pie 1 14%
Spooky Candles.png Spooky Candles 1 21%
Monster Beanie.png Monster Beanie 1 21%
Brain Hat.png Brain Hat 1 21%
Franken Hat.png Franken Hat 1 21%
The Incredible Hello Kitty.png The Incredible Hello Kitty #3 1 The rarest prize. 2%
Clues on the Beach (Twilight Mix) 1 14%
Haunts and Taunts 1 14%
Sauntering in the Fog (Full Mix) 1 14%
Definitely Haunted (Twilight Mix) 1 14%
Swampmallow Jam (Full Mix) 1 14%
Lily Frog Hop (Twilight Mix) 1 14%
Apple Grab 1 14%

Bogging for Apples Gallery

Gem Match

"Gem Match" Information
Gem Match is a mini game located in a building on Gemstone Mountain Icon.png Gemstone Mountain, to the right of the Dance Hall and above the Fast Travel Icon.png Gemstone Town mailbox.

Paying one Game Ticket Icon.png Game Ticket to the Nul Icon.png nul opens the door to the Gem Match room. Once the player enters the room, they can activate any of the 12 Gem Match Icon.png crystals, which will turn one of the following colors: red, yellow, sky blue, green, or purple. Then, they must activate another crystal, attempting to choose a match to the previously activated crystal. (There are always 2 crystals of every color except for green, which has 4.)

Matching a set earns a basic prize and keeps the crystals lit. Failing to match earns nothing and causes the pair to turn back off.

If the player fails to activate a matched set of crystals twice, the current game ends, and they must pay another Game Ticket Icon.png Game Ticket to continue again. The crystals that were matched correctly during a previous round will stay lit for the next round. Once the player has found all of the correct matches, all of the crystals will be reset.

"Two turns for one Game Ticket Icon.png Game Ticket. Each match gives you a free turn!"

Tips for Winning Gem Match

If you have a difficult time remembering the color order of the crystals, take notes outside of the game. It is especially important to take notes of what crystals are what colors if you do not have enough tickets to finish a room, so you will have to continue playing another day. (Your progress is maintained between days.)

It may also help to play in a systematic way. For example, start with the top left crystal, go crystal by crystal to the right, start the next row, and repeat. If you move erratically between crystals, it is easier to lose track of where you spotted what color.

Prizes for Gem Match

List of Potential Prizes
Image Name Amount Further Information Probability
Iron.png Iron 2 One of the possible rewards for matching 2 gems. -
Shiny.png Shiny 2 One of the possible rewards for matching 2 gems. -
Rocky Music Box.png Rocky Music Box 1 Possible prize for finishing the room. 10%
Ingot.png Ingot 1 Possible prize for finishing the room. 20%
The Adventures.png The Adventures #11 1 Possible prize for finishing the room. The rarest prize. 2%
Nordic armchair.png Nordic Armchair 1 Possible prize for finishing the room. 10%
Nordic bed.png Nordic Bed 1 Possible prize for finishing the room. 10%
Nordic bookshelf.png Nordic Bookshelf 1 Possible prize for finishing the room. 10%
Nordic coffee table.png Nordic Coffee Table 1 Possible prize for finishing the room. 10%
Rockadoodler (Full Mix) 1 10%
Dancing is Great Cardio (Full Mix) 1 10%
Gem Match 1 10%

Gem Match Gallery

Red Hot Rampage

"Red Hot Rampage" Information
Red Hot Rampage is a mini game located on Mount Hothead Icon.png Mount Hothead on the same level as the Pizza Oven Icon.png Pizza Oven, in the middle of the lava flow between the Pizza Oven and the Fast Travel Icon.png Hot Springs.

Once entering the maze and paying one Game Ticket Icon.png Game Ticket to the Nul Icon.png nul, the player must collect 14 Magma Bloom.png Magma Blooms on the ground throughout the maze before the 180 second (i.e. 3 minute) timer runs out.

"One Game Ticket Icon.png Game Ticket for three minutes. Find as many Magma Bloom.png Magma Blooms as you can!"

Tips for Winning Red Hot Rampage

Companion Abilities do not work in Red Hot Rampage at all, except for the daily free play from Badtz-Maru-Icon.png Badtz-maru. Therefore, you have to rely on your own skills.

Potions do work, but a potion taken at the start of the game will not last through the entire game. If you cannot beat the game without potions, it is best to take a Speedy Walking Potion.png Speedy Walking Potion before paying your ticket, then take a Thermal Potion.png Thermal Potion when you reach a jump where you need the extra boost.

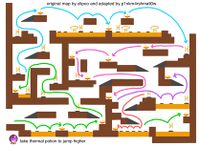
The best route is as follows:
A map of a route through Red Hot Rampage.
Best Path Instructions (expand to view)
  1. From the start, jump across the platforms at the bottom to get a magma bloom.
  2. Continue jumping right to the second magma bloom.
  3. Jump at the stairs and climb to get on them. Proceed to the thermal air vent, and hold the jump button to deploy your baloons and rise. Once high enough, float to the left. At the next vent, float up again and to the right, and then float on the next vent and go to the left. Fall into the hole you come to, but deploy your balloons so that you can float to the platform with the bloom in that hole.
  4. Either use the vent to rise up or jump into the lava to respawn above. Use the thermal vent to the left of the hole to rise to a staircase, then use the thermal vent at the top of the stairs to aim towards the left. Jump up those stairs, then time your jump above the air vent so that you have your balloons deployed when it turns on. It will take you to another staircase with a magma bloom at the top.
  5. Jump from there and float right with your balloons. It is easiest to float to the next thermal vent and jump down from that platform to collect a magma bloom in the middle of the lava pools.
  6. Take the thermal to the right to get to the top of the next platform, which has another magma bloom.
  7. Jump to the right and float over the lava, then let yourself fall onto another air vent. While standing on the vent, jump and deploy your balloons. You need to quickly float to the left, such that you are still being boosted when you do so. If you time it correctly, you can float to a platform below the lava pools above, where you can collect a magma bloom to the left.
    • Note: The above is very much the hardest jump to manage in this mini game. If you need to take a Thermal Potion, you may want to take it here. However, it is possible to manage without a potion.
  8. Jump left off the platform, and float until you see another magma bloom to pick.
  9. Jump left off of this platform as well, and try to float to another platform that has a gap before another magma bloom. (If you can't quite manage to reach the platform, you can use the vent to rise up.) Collect the magma bloom at the top.
  10. Jump into the vent's gap without ballooning. There is another magma bloom at the bottom.
  11. Proceed right, jumping over a gap with a staircase. Jump off the platform, then float down and to the left to get a magma bloom.
  12. Jump back to the vent to the right, then go across the lava platforms to the right to another vent. Time yourself to miss the lava eruption, then take the vent up to a staircase with a magma bloom at the top.
  13. Go back to the middle vent, then go left and down. Continue heading down until you reach a platform bridge over lava, then run to collect a magma bloom to the left.
  14. Wait for the platforms to reappear, then head right to where a vent turns on and off in the middle of a lava pool. Time your jump to catch the vent when it turns on, then float up and to the right where a magma bloom is on a ledge.

Prizes for Red Hot Rampage

Any Magma Bloom.png magma blooms picked up during the game are added to the player's inventory.

List of Potential Prizes
Image Name Amount Further Information Probability
Magma Bloom.png Magma Bloom - Number received is number collected. -
Mama’s Apple Pie.png Mama's Apple Pie 1 Basic reward for winning. -
Cinnamon Bread.png Cinnamon Bread 1 One of the most common prizes. 20%
Pineapple Lava Soda.png Pineapple Lava Soda 1 One of the most common prizes. 10%
Darkgrapeman.png Darkgrapeman #10 1 Possibly the rarest prize. 2%
Nordic dining table.png Nordic Dining Table 1 A rare prize. 10%
Nordic dining chair.png Nordic Dining Chair 1 One of the rarer prizes. 10%
Nordic dresser.png Nordic Dresser 1 10%
Nordic mirror.png Nordic Mirror 1 10%
Resort Roundabout (Twilight Mix) 1 10%
New Clothes and Lava Flows (Full Mix) 1 10%
Hothead Heya (Full Mix) 1 10%
Metal Ways for Stressful Days 1 10%
Memory Rush 1 2%
Red Hot Rampage 1 10%

Red Hot Rampage Gallery

Seapony Racing

"Seapony Racing" Information
Seapony Racing is a mini game located in Rainbow Reef Icon.png Rainbow Reef, near the Recycling Plant Icon.png Recycling Plant and the Fast Travel Icon.png Cozy Islands.

The player pay the Nul Icon.png nul one Game Ticket Icon.png Game Ticket to choose the Sapphire Seapony.png Seapony that they think will win the race! They must choose either Seapony #1, Seapony #2, or Seapony #3. The Seapony's placement at the end of the race will determine what prize the player receives.

"Spend a Game Ticket Icon.png Game Ticket to watch the Races?"

Tips for Winning Seapony Racing

There is no way to improve your chances of winning. The game is entirely based on luck.

Prizes for Seapony Racing

List of Potential Prizes
Image Name Amount Further Information Probability
Box Clams.png Box Clams 5 Prize for the Seapony placing 3rd. -
Seashell.png Seashell 10 Prize for the Seapony placing 2nd. -
Aquatic Gift.png Aquatic Gift 1 Possible 1st place prize. 20%
Froggy Power.png Froggy Power #7 1 Possible 1st place prize. One of the rarest prizes. 2%
Nordic plant.png Nordic Plant 1 Possible 1st place prize. 10%
Nordic side table.png Nordic Side Table 1 Possible 1st place prize. 10%
Nordic sofa.png Nordic Sofa 1 Possible 1st place prize. One of the rarest prizes. 2%
Nordic lamp.png Nordic Standing Lamp 1 Possible 1st place prize. 10%
Nordic stool.png Nordic Stool 1 Possible 1st place prize. 10%
Seapony Race 1 10%
Mermaid Tiara (Full Mix) 1 10%
Reef Revival (Full Mix) 1 10%
Cinnamoangels: Everyday 1 2%
Hapidanbui: Together Forever 1 2%
Brain Blast 1 2%

Seapony Racing Gallery

Rockadoodler Roundup

"Rockadoodler Roundup" Information
Rockadoodler Roundup is a mini game located at the Rockadoodler Corral, which is in the upper region (north of the Fast Travel Icon.png Oasis) of Gemstone Mountain Icon.png Gemstone Mountain. The Rockadoodler Roundup mini game is unlocked after the player has completed the "Rockadoodler Roundup" quest.

After paying one Game Ticket Icon.png Game Ticket to the Nul Icon.png nul, the player must collect 15 Rockadoodler.png Rockadoodlers with their Net.png Net before the 60-second (i.e. one minute) timer runs out.

"One Game Ticket Icon.png Game Ticket for one minute. Round up as many Rockadoodler.png Rockadoodlers as you can!"

Tips for Winning Rockadoodler Roundup

Be careful not to chase too far after the Rockadoodlers. It is possible to go outside of the game's boundary (which is unmarked), causing you to automatically lose the game.You should be able to win simply by keeping to the area in front of the corral (between the entrance and the rocks). You may not even have to run after anything because there should be many Rockadoodlers running past and around you. Keep yourself ready to net any Rockadoodler that comes close, and move just enough to catch any that are out of reach.

Companion Abilities can assist with this game but are not necessary.

  • Pekkle-icon.png Pekkle's Speed Walker ability helps chase after Rockadoodlers more easily.
  • Keroppi-icon.png Keroppi's Critter Friend ability makes the Rockadoodlers less likely to startle, and his Critter Calmer ability makes Rockadoodlers move more slowly.
  • Pompompurin-icon.png Pompompurin's Slow & Steady ability increases the time on the clock by 5 seconds.

You can also use a Speedy Walking Potion.png Speedy Walking Potion to move faster if not using Pekkle.

Wearing the Critter Catcher Hat.png Critter Catcher outfit provides bonuses that mimic Keroppi-icon.png Keroppi's abilities.

Prizes for Rockadoodler Roundup

List of Potential Prizes
Image Name Amount Further Information Probability
Egg.png Egg 1+ Losing the game earns 5 Eggs.
A basic reward for winning is 7 Eggs.
A possible prize is 1 Egg.
25%
Shiny.png Shiny 1 Basic reward for winning. -
Rockadoodler Nest Hat.png Rockadoodler Nest Hat 1 One of the rarest prizes. 1%
Danger Doodler.png Danger Doodler #1 1 10%
Danger Doodler.png Danger Doodler #2 1 7%
Danger Doodler.png Danger Doodler #3 1 7%
Danger Doodler.png Danger Doodler #4 1 7%
Danger Doodler.png Danger Doodler #5 1 One of the rarest prizes. 1%
Rockadoodle Roundup 1 7%
Sundown in Gemstone Town (Twilight Mix) 1 7%
Trottin' with Tumbleweeds (Full Mix) 1 7%

Rockadoodler Roundup Gallery

Crane Craze

"Crane Craze" Information

This page is not complete.

Crane Craze is a mini game located in Merry Meadow Icon.webp Merry Meadow, in the Fast Travel Icon.png Merry Meadows Temple area accessible after growing the third Beanstalk from a Giant Seed.png Giant Seed and completing the "Petal Puzzle" quest. It is inside a round stone doorway in a tree trunk previously closed by a door with gems on it.

For 1 Game Ticket Icon.png game ticket, the Nul Icon.png nul allows the player to have one turn with no time limit, and the player must choose between Hard Mode or Easy Mode. The modes have different prizes available. Hard mode also has crates move faster and more erratically, though there is a pattern to how crates move.

The game is played by guiding a Crane Craze.png crane around a circular pool. The pool has 10 moving lily pads with crates on top. The crates have images of their contents on them. The player stands on the blue triangle buttons to use them as a directional pad to guide the crane around the pool. When satisfied with the crane's placement and what it might grab, the player must step on the purple circle button to trigger the crane to lower.

If the crane manages to grab a crate, it will bring it to the landing circle and drop it there, where the player must open their prize with a crate. If it fails to grab a crate, a crate with 3 Pollen Puff.png Pollen Puffs inside will be dropped on the landing circle.

"One turn for one Game Ticket Icon.png Game Ticket. Try the hard mode for better prizes!"

Tips for Winning Crane Craze

The game relies on good timing and good positioning. The crates usually float closer to the pool's edge than its center, so it is better to move the crane away from the center. Also, make sure that you can see the shadow of the crane in the water, as the shadow allows you to judge where the crane will reach when lowered.

Some devices do not display the shadow properly, which can increase the difficulty. If you do not have a shadow that appears, use the stone blocks around the edge of the pond to help judge where the crane will land. If you make a habit of only moving the crane in one direction, it is easier to remember where the crane will reach the pond.

Once you have the crane positioned with the directional buttons, move away from them and towards the circle button without stepping on it. Only step on the button when you think the crane will catch a crate when lowered. If the claw does not close on both sides of a crate, the catch will fail.

Wish me mell Icon.webp Wish me mell's Slow and Steady ability reduces the speed of the prizes in Crane Craze by 25%. She is a particularly useful companion if trying to win Hard Mode. No other characters have character abilities that affect how the game is played.

Prizes for Crane Craze

List of Potential Prizes
Image Name Amount in Easy Mode Further Information Image Name Amount in Hard Mode Further Information
Pollen Puff.png Pollen Puff 3 This is the prize when the crane fails to catch a crate. Pollen Puff.png Pollen Puff 3 This is the prize when the crane fails to catch a crate.
Rare Candle.png Rare Candle 1 The daily limit is 4: 1 from Easy Mode and 3 from Hard Mode. Rare Candle.png Rare Candle 3 The daily limit is 4: 1 from Easy Mode and 3 from Hard Mode.
Penstemum Candle.png Penstemum Candle 2 The daily limit is 18: 6 from Easy Mode and 12 from Hard Mode. Penstemum Candle.png Penstemum Candle 6 The daily limit is 18: 6 from Easy Mode and 12 from Hard Mode.
Mystery Seed Capsule.png Mystery Seed Capsule 1 Mystery Seed Capsule.png Mystery Seed Capsule 1
Stick.png Stick 5 Stick.png Stick 10
Lamb Plush.png Lamb Plush 1 Not the regional types. Volcanic Lamb Plush.png Lamb Plush 1 The lamb plush item can be any regional type (see Lamb Plushies).
Gift Box.png Gift Box 1 Not the regional types. Dreamy Gift.png Gift Box 1 The gift box item can be any regional type (see Gift Boxes).
Aquatic Souvenir Doll.png Souvenir Doll 1 The souvenir doll item can be any type (see Souvenir Dolls). Designer Island Doll.png Designer Island Doll 1
Kitchen Icon.png Kitchen Furniture 1 The furniture item can be any item in the collection. Flower Rangers.png Flower Rangers #20 1
Worm Tail.png Worm Tail 1 Antique Icon.webp Antique Furniture 1 The furniture item can be any item in the collection.
Blank Book.png Blank Book 1 TropicalIcon.webp Coastal Furniture 1 The furniture item can be any item in the collection.
Ingot.png Ingot 1 Volcano Soundtrack.png Volcano Soundtrack 1
Woodblock.png Woodblock 1 Sounds of Steel.png Sounds of Steel 1
Mechanism.png Mechanism 1 Mountain Soundtrack.png Mountain Soundtrack 1
Spark.png Spark 1 Tropical Music Box.png Music Box 1 The music box item can be any regional type (see Music Boxes).
Jack o’ Lantern.png Jack-O-Lantern 1 Critter Totem.png Critter Totem 1
Water Balloon.png Water Balloon 1 Swampy Material.png Material 1 The material item can be any regional type (see Materials).
Music Disc -12.png Dance of Blooms (Full Mix) 1 Music Disc -12.png Dance of Blooms (Full Mix) 1
Music Disc -12.png Petal Keys (Twilight Mix) 1 Music Disc -12.png Petal Keys (Twilight Mix) 1
Music Disc -12.png Winds and Wildflowers (Full Mix) 1 Music Disc -12.png Winds and Wildflowers (Full Mix) 1
Music Disc -12.png Fantastical Flora (Full Mix) 1 Music Disc -12.png Fantastical Flora (Full Mix) 1
Music Disc -12.png Fantastical Flora (Twilight Mix) 1 Music Disc -12.png Fantastical Flora (Twilight Mix) 1
Music Disc -18.png Crane Craze: Easy 1 Music Disc -18.png Crane Craze: Hard 1
Music Disc -2.png Surfside Sunrise (Full Mix) 1 Music Disc -16.png Gzzrt 1
Ancient Inventions.png Ancient Inventions 1
Interactive History of Chocolate.png Interactive History of Chocolate 1
Meditations on Resilience.png Meditations on Resilience 1
Mermaid Figure.png Mermaid Figure 1
Stacked Stones.png Stacked Stones 1
Volcanic Guitar.png Volcanic Guitar 1

Crane Craze Gallery